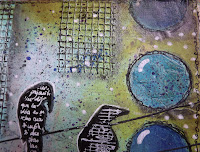
Hello dear you. Here are pics of the very first page painted in my handmade art journal. For the very first time - and just in case it might be of any interest to you - I´m adding a step-by-step of the process. Hope it´s clear and that you´ll like it.
Esta es la página / This is the page
Paso a paso / Step-by-step
Step 1 : collagePega lo que tienes a mano para dar un poco de textura.
Use whatever you have at hand for some texture.

Pinte una mano de gesso. Utilice una toallita de bebe para dejar ver un poco lo que hay debajo...si lo quieres, por supuesto.
I painted a coat of gesso, using a baby wipe to let some bits show through...that´s only if you wish too obviously.

Step 3 :
Utilice pintura acrílica azul, una vez más usando una toallita de bebe para dejar ver un poco lo que hay debajo. Una vez seco, utilice un sello imitando manchitas.
I painted a coat of blue acrylic, once more using a baby wipe to let some bits show through. Once dry, I used a clear stamps to give the idea of stains here and there.

Step 4 :
Utilice pintura acrílica verde alrededor de la página dejando la parte central en azul.
I used green acrylic paint around the page, leaving the centre in blue.

Step 5 :
Hice circulitos que pinte en varios tonos de azules. Luego utilice mi boli Micron para hacer doodle alrededor de los mismos para que resalten un poco más.
I made circles that I painted in various blues then used my Micron to doodle around them to make them stand out a little more.
Step 6 :
Utilicé un viejo cepillo de diente para hacer salpicaduras de pintura azul y morada. Añadí puntitos blancos, reflejos de luz y algo de negro en la malla para que resalte el conjunto.
I used an old toothbrush to splatter blue and violet paint. Then I added white dots, light reflections and a bit of black paint over the mesh to make it all stand out a little.
Step 7 :
Pegué dos hilos negros. Imprimí siluetas de cuervos que
Milliande pone generosamente a nuestra disposición aquí: Milliande´s
crow silhouettes. Las recorté y las pegué encima de los dos hilos negros.
I glued
2 black threads, printed the crows silhouettes from that page: Milliande´s crow silhouettes (courtesy of Milliande). I cut them
and glued them on top of the black threads.
Último paso / final step :

Un poco de blanco dentro de las siluetas, Distress Ink verde y marrón alrededor de la página, sombras hechas a lápiz con un difumino
debajo de los circulitos y VOILÀ !

Un poco de blanco dentro de las siluetas, Distress Ink verde y marrón alrededor de la página, sombras hechas a lápiz con un difumino
debajo de los circulitos y VOILÀ !
A bit of journaling in the silhouettes, green and brown Distress Ink
around the page, shadows under the circles made with a graphite
pencil and VOILÀ !
around the page, shadows under the circles made with a graphite
pencil and VOILÀ !


I adore this page! The colors, and everything else is just gorgeous! I just love your style Nacima! And thanks for the step by step instructions, they are always good for learning and inspiration.
ResponderEliminaroh wow, wow, wow! Thank you so much Sonja for this very stimulating comment!
ResponderEliminarThat looks great and your instructions were very good too. I am a beginner so I really appreciate tutorials. Thanks for sharing.
ResponderEliminarHi Pam, I´m happy it has helped you. I don´t know what happened with the pics and the instructions in the blog but they were not quite well alined when published. Hope it was clear enough anyhow. I consider myself a beginner too and I´m very happy to find free tutorials, so, I thought I might try one myself and see how it goes. I may try another one. Thanks again for your comment Pam.
Eliminar